Wednesday, 29 June 2016

WOW: What a Week!

WOW = WIPs On Wednesdays
I'm still all in a swoon about Narelle's Love Entwined looking so magnificent at the Sydney Quilt Show this year. I love all my quilts but it's a extra special feeling when they start showing up at Quilt Shows around the world and looking beautiful. I know there'll be a Love Entwined hanging at Houston this year too and I can tell you, I'm over the moon about it.

A few people have asked me if I'll release another free BOM after Hazel (which is nearly finished) and I'm happy to tell you that yes, I certainly will - so stay tuned. I'll announce the next free BOM when Hazel is completely done and dusted. Once again, I will be showing you what the completed quilt looks like because lots of members told me it was too hard to plan for a mystery, and I can appreciate that. So it will be a full reveal.

Thank you to everyone who supported me and purchased either Goldi, Bed of Roses (or both!) in the last 48 hours. I have a lot of patterns which I have decided to release and will be offering them for sale as and when I draft them for PDF patterning. Due to some loyal copyists out there, I'm no longer showing my design process here on my blog. This is because I design numerous quilts at once and it can be months before I get around to completing something I started months before - plenty of time for someone to take my idea, run with it and pose it as their own. So I'll only be showing them when they're ready for sale. And the next one? It's lovely, I can't wait to show it off..

What's Your WOW?

Monday, 27 June 2016

Narelle's 'Love Entwined' wins Viewer's Choice!

Narelle Birchall, Love Entwined

I'm thrilled to bits to hear this morning that Narelle's Love Entwined has won Viewer's Choice at the Sydney Quilt Show! It is an extraordinary piece of work with a breathtaking standard and intensity of workmanship. I know, I've been lucky enough to see it in real life.

Not only was Narelle the first person to finish Love Entwined, she finished it to an excelled standard of beauty and dedication and really did the pattern proud. Can you tell I love it?

Judging is a fickle thing, so it's all the more wonderful when quilters get to cast their own vote for their own quilt of choice - and it's no surprise to me that Narelle won Viewer's Choice. Frankly, I would have been amazed if she hadn't.

See more pics of Narelle's amazing quilt over in the Love Entwined Gallery by clicking here now.  

Saturday, 25 June 2016

New Patterns: Goldi & Bed of Roses

Bed of Roses (finished size:66 x 66 inches)

So many patterns, so little time. When will I find the time to squeeze in this romantic beauty? Oh, I don't know but I have a feeling I will - somehow. I simply have to - those rose heads are calling me and I have no excuses because this quilt simplifies all those fabric indecisions - you only need to pick 4 fabrics and your quilt to ready to make.

I love limited colour schemes at the moment, they sooth my quilting conscience because they allow me to actually start without buying any additional prints!

I designed a series of quilts on this layout and in this size and have been lucky enough to see them made in real life by friends who were after 'quicker' wedding quilts to give as gifts and these two really satisfy without being overly committal time wise but still having every inch of charm and handmade beauty that you expect from treasured pieces.

I am madly in love with the white background because it would suit my current living room as a throw where I take my tea in the afternoons - and I love that white brightness against the wood and leather of my room -it brightens the room and matches my teacups- in fact I can already imagine it looking like an extension of my tea service, and I just love that idea so much that I can't pass it up. But, you know me - I did play. And look what happened when I made it in gold and browns. How warm and cozy does this look??
Goldi was designed to show off my gorgeous gold fabrics - which have been stacking up but difficult to work into other designs, so this one's all about the golds and warms browns with some splashes of red and pink to make the whole thing shimmer.
Goldi (finished size:66 x 66 inches)

The flowers in Goldi have a more naive feel and I love them all the more for it - they're large enough to show off those lovely print fabrics you're hesitant about cutting into. Is it just me, or are there some fabulous fabrics that just don't work once you've started cutting into them? I had that scenario on my own design board a few weeks ago and it encouraged me to make bigger designs, spatially, to give those types of fabrics a chance to breathe. These flower heads allow you to see glimpses of those gorgeous fabrics without the fabrics completely taking over the design. I think it's a difficult balance sometimes and Goldi strikes just the right chord with my eye.

For me, gold is the only way to go with Goldi, but I bet you're still as curious as I was to wonder what it would look like in lights? Like this:
I'm so happy to be releasing two new pattern today, it's always a special feeling to throw open my design folio and share my work with other quilters. To celebrate the release of Goldi and Bed of Roses, I'm offering both patterns for just $4.80 (USD) for 48 hours only. After that, they'll go into my online shop for $19.95.

Wednesday, 22 June 2016

WOW: Time for a New Pattern!

WOW = WIPs On Wednesdays
I'm loving these fabrics together, they really strike a chord with me 
I'm going to use them together in my new quilt design

I'm PDF-ing my latest pattern this morning. It's completely gorgeous (if I do say so myself!) and I hope to show it off straight after WOW this week, so be sure to pop back and have a look for yourself! This is all completely a spur of the moment thing, but it's such a straightforward quilt that I can get the pattern done in one day, so I've decided, why not?

I designed the quilt in question as a wedding gift for a friend who was looking for that special kind of quilt you only recognize when you set your eyes on it. I let her have a look at my latest designs and she picked this one out. Well, it was a good choice, she went ahead to make it up and I saw it for the first time on the weekend. What can I say? I was really impressed with how effective it looks, so I've decided to release it. 

There are many patterns in my folio that are ready for release ...but I haven't released them because I haven't had time to make them. I kind of feel that I should make all the quilts I design. This is an impossible task in just one lifetime, so I try to prioritize, but it's hard. So, I'm torn about seeing them made up..or just letting them sit on my shelf. Now, I've finally decided that I am at an age where I need to just put them out - so stay tuned and be sure to check back on Friday :) 
What's Your WOW?

Friday, 17 June 2016

LE: Month by Month: Part 4

After all the preparation and fabric decisions of Parts 1-3, I couldn't wait to start the vases - and they were a real delight to make. You have the choice of finding the right fabric for your vase, then whether of not you'd like to embroider or applique your stems. Lastly, is the pleasure of the flowers themselves. Will your central lily be a white one? Or perhaps a pink or yellow one? Maybe you'll change the flowers completely? Finally in Part 4, you can play and create and even shape the design to bend to your own floral tastes - if that's what suits you.

I had a lot of fun auditioning fabrics for my vase and seriously considered fussy cutting huge rose printed blooms before sticking with the pattern and using printed fabrics to create texture rather than replace the actual applique pieces.

In the archive below, you'll find details of my embroidery stitch choice, how I auditioned my vase fabric and how I created my pieces. It's also time to consider what method you'll use to create your berries. There were some ingenious suggestions at the time - from using washers, to balls of wadding, to using a hole on plastic and creating stitched 'balls'. Whichever you opt for, it's going to be extraordinary, with LE, everything always is - the quilt simply demands it!


Love Entwined is an extraordinary historic quilt pattern with it's own dedicated Group over on Facebook. You can purchase the pattern outright, or sign up to a monthly subscription that delivers a 'Part' to your email in-box each month for just $9.95. If you're interested in this once in a lifetime heirloom quilt, there's never been a better time to start. We've gone before you and have the blog posts, pics and experience to show you how we did it. Also, with an encouraging online group making LE themselves, there's always someone to connect with and chat to about this quilt.

What's stopping you?

Wednesday, 15 June 2016

WOW: Getting Busy With The Next BOM

WOW = WIPs On Wednesdays
What a week! Sweet 2016 Part 5 was released yesterday and so was Hazel and Little Hazel Part 5 and Oma's Blues went on to Part 6. That's 3 BOMs moving along in one week, what an effort! I love releasing BOMs, it really gives me such a thrill to share what I know and watch others enjoy and play around with my designs, I feel so lucky to be connected to so many thousand creative quilters and sewers out there - you never fail to impress and inspire me.

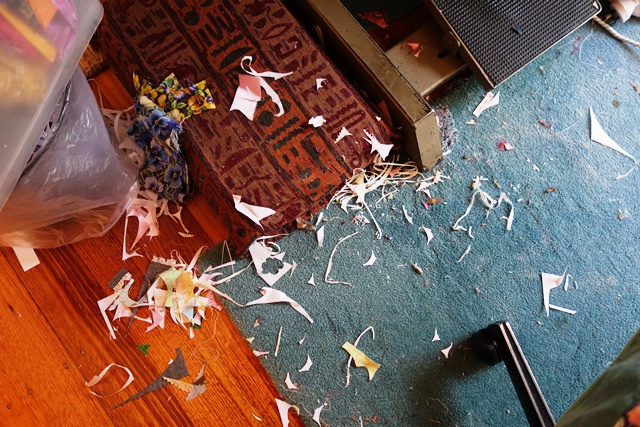
As you can see, I've been busy and my floor is a mess-but it's a good mess and I'm glad that I can shut the door of my sewing room and act like nothing's happened when it's time to go and prepare dinner. Thank goodness for creative space!

What's Your WOW?

Tuesday, 14 June 2016

Hazel & Little Hazel: Part 6

Next time I make a pieced quilt, I'm going to have to remember that Fassett fabrics shine on camera and look neon! I really don't think they look this neon in real life, but my photos in every lighting condition seem to prove otherwise. Anyway, luckily I love my Fassett Hazel because it sure does draw attention to itself!

Those of you making Little Hazel, this is your last month of blocks! Next month it's all about putting the top together and finishing the quilt. Can you believe it?! Where did the time go? I'm already wondering what will happen after Hazel...I'm getting addicted to the progress pics and don't know if I'm ready to get through a coffee break without seeing someone's work. 

Today we're focusing on the Hazel Mosaic block and given what you've already accomplished, this is easy. Here's a step by step guide to how I made mine - you'll see how straightforward and self explanatory it is.


Hazel & Little Hazel are my current Free BOMs  
You can join my BOM Group my clicking here now. It's full of fabulous, talented women sharing their work, ideas and inspirations as they make my quilt patterns. Join us and our friendly, supportive community today. 
OR 
Wait until the 15th of each month and download the available pattern right here directly on my blog. The choice is yours. My old Yahoo Group has closed due to limitations on the platform. If you haven't come over to the new group, now is a good time.

Monday, 13 June 2016

Sweet 2016, Part 5: Cupcake Cuties

 
This month it's time to indulge in some super sweet Cupcake Cuties and what a tray they make! I'm having more fun as each month goes by - I love choosing between fabrics for the most delicious combinations - and the best bit? Applique Cupcake Cuties are of course, guilt free. And that's a good thing as I've been dreaming of my all time favourite coated rum balls since making them for my quilt! 

Who doesn't love a cherry on top? And with just a single line in permanent marker over the fabric, you can add dimension to your cherry that looks all the more convincing! 
Here's how I made my own cuties this month:
I've gone with two types of lovely pink fabric for my first cupcake 
and topped it with some currant fussy cutting
 This is what the underside looks like, and yes I've opted to turn edge my applique again! I don't know why I didn't just raw edge the whole thing like I first planned, but once again, as soon as I start to applique anything, I always return to this method!
For the base of the cake, I simply cut a larger body piece in one shape
and shaded the in between lines with permanent marker in brown 

This is what my second cupcake looks like, 
I used the same pinks for the tops and added a cherry on top, because why not? 
 and this is what the underside looks like
 The meringue for one came together like this
and as always, I glue along with Elmer's to hold my shapes in place
layer by layer
 and so on 
 and the front, with my fussy cut flower
I opted for beige and blue, but your meringue could just as easily be white or anything else that tickles your fancy. For mine, it needed a sprinkling of sugar, so I stitched on some little beads to finish
The praline comes together in the same way: by layers
 And as I always say, it's the prepping that makes it all 'come together'
I find that labeling each piece is the only way I can keep track
Applique in this way is my own preference, but you could of course cut larger overall 'background' shapes for each motif and draw in the details with permanent makers, if you prefer. This quilt is perfect for trying out new techniques, so don't worry if the thought of so many pieces daunts you!
 step by step..
Rumballs are my favorite and coated rum balls (or giant truffles if you want to change them) 
have to come in threes, one or two is never enough!
As you can see, when I drew my cake stand, I added details as below that don't appear in your pattern. This is because I couldn't digitally add the specks, however you can add these details with your choice of fabric, beading or pen work. I'm already making another set of three rum balls for a fabric 'postcard' wall hanging for my DD who is also a rum ball addict and in that version, the coating is dark chocolate on a chocolate ball covered in tiny brown beads. For this wall hanging however, I have decided on pink, yellow and green coatings to harmonize with the colors used throughout. Feel free to make it up as you go.
 and the method is just the same: prep your pieces, clip and turn
 be neat and use an orange stick or pin to help with those tricky edges
 and the front...
or you could just raw edge the applique, do whatever suits your own style 
 Yum!
When it comes to creating the dome this month, I stitched bottom strips together
 which alternate light and dark grey
The grey tray 'plate' is a single curved line, but after placing my motif shaped in position, I went back and removed sections of grey plate background in order to remove bulk behind my shapes. You don't have to do this, I just decided to because I always like to remove any bulk.
 So it looked like this before the shapes went down
and this is what an afternoon's applique looks like!
This is where we are up to, placement wise is Part 5
remember not to sew down your domes onto a background until the very end!
Understanding the pattern release schedule: anyone can join Sweet 2016 at any time and when they do, they will receive a new block each month from that point onward. The day they receive each new block will depend on the date they signed up and made their first payment. Everyone who starts Sweet 2016, starts at the beginning, Part 1. Specific blocks cannot be purchased out of turn. 

Whenever you choose to start this BOM, be sure to keep us updated on your progress by sharing your work over in our Sweet 2016 BOM Facebook Group, see you there!

'Sweet 2016' is my current Mystery Applique BOM
It's just $3.95 per month
Delivered digitally, to your email inbox each month

Related Posts Plugin for WordPress, Blogger...