Friday, 21 August 2015

Oma's Blues: Preparing Blocks for Border 4

This post relates to Part 9 of Oma's Blues
Released Sept 15th 
Before joining up your blocks to create Border 4, you will need to accurately trim them down to size. This is doubly important for Oma's Blues because connecting 72x blocks means accuracy must be key. Even just a few mms will make a problematic difference that will have to be corrected. It all adds up and with blocks like this, you need to know and have your eye on the measure.
 Each border 4 block must measure 6.5 x 6.5 inches precisely (6 inches is the finished block size)
 I've stacked my ironed blocks, ready for trimming
I'm using a turning cutting matt - it's like a lazy susan, it simply turns as I cut. In fact, it's so easy to use I have to take care that I don't cut myself with the rotary cutter! It takes pressure off my wrists and it speeds up the process, I love it.

Oma's Blues is my current FREE BOM. 
You can still join this free BOM right now - all parts are available over in my Group.

Wednesday, 19 August 2015

WOW: Trimming Oma

WOW=WIPs On Wednesday
I'm trimming my blocks to connect them to create my border for Oma's Blues. I'm finally a bit ahead of the BOM Schedule ( I need a drum roll I think), so this will be happening in Part 9 which is released Sept 15th.

What's Your WOW?


Tuesday, 18 August 2015

Oma's Blues: Bird & Bouquet

With the vase done, it's time to think about my flower arrangement.
As always, I've prepped the many hundreds of pieces in different envelopes for use later. This really works for me as I find that when I'm in the mood to trace and cut fusible, it's better for me to do a lot of it in one sitting, pack it away by stage of quilt and then return to it later when needed. 
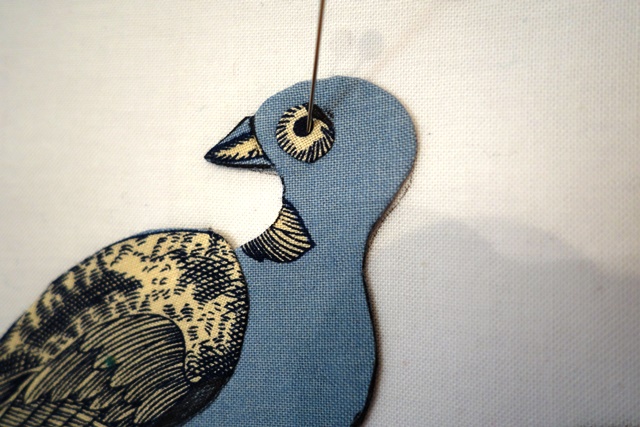
The bird fabric was an instant choice
 and I love the fussy cut eye detail
With the rest of the flowers, its a case of trial and error. Some fabrics that I loved in blues just didn't work when grouped together
Here I'm playing with several different flower heads. When I cut my fusible, I usually cut multiples when it comes to flowers as I know I will always umm and ahhh over these. I have a whole box of LE and LE2 flowers that are beautiful but didn't fit the quilt for whatever reason and I pop these left over pieces in a box. One day, I will simply iron them all down and create a wall hanging of wild flowers from my many quilt applique leftovers. So you see, I don't mind making extra. It's all part of the fun.
 and I'm still working on the finishing details...
The next time you see this centre, it will be completed and the charm plates will be stitched into position all the way around.


Oma's Blues is my current FREE BOM. 
You can still join this free BOM right now - all parts are available over in my Group.

Monday, 17 August 2015

Oma's Roses

 Lucky I have a daylight lamp, otherwise I wouldn't be able to work in the current wintery gloom!
I make my Oma's Roses exactly as I recommend in the pattern, in numbered pieces and once again using wash away fusible that makes the whole process quicker and easier than ever before.
 Just another creative mess. This is actually my kitchen table!
 My finished lovely Delfty rose
 Remember that two face right and two face left!
 And you'll see these again once I join my Oma's Blues border

Oma's Blues is my current FREE BOM. 
You can still join this free BOM right now - all parts are available over in my Group.

Friday, 14 August 2015

Oma's Blues: Part 8 is Launched

I normally launch of the 15th of each month, but as it's Friday and I have housework to do before the weekend, I've decided to post early! Here I am working on a block before it's actually released- I do think that's a first for me! In Part 8 we are making 30x BB2 blocks. 
Having completed my BB1 blocks, I had another tough afternoon opting for the fabrics. I finally settled on this beautiful Leesa Chandler fabric because I felt it blended with almost every other blue in the quilt.
 First I stitch the base blocks
Once all 30x bases of the blocks are done, they look like this. And just like in BB1, I press the seams towards the dark area of the block, I don't want any show through.
 These are the applique pieces I prepared earlier. I'll be appliqueing these on top. This is just the way I have chosen to create these blocks. I prefer to applique the opposing shapes on top of the block. You could of course piece the whole thing. This method just works best for me but is in no way the only way to create BB2. Do what works for you. 
 This is what my block will look like when the applique is in position
I've decided that I'm going to stitch the base block (without the applique) into position first and then applique the shapes down afterwards, when the created border is in place.
I'll double count my pieces to make sure I don't make too many or few and then I'll put them back into my prep box until I'm ready to stitch them down later. For my applique pieces, I have once again used Polyfuse, it's a wash way fusible and I'm using it throughout this quilt as I find that it speeds up my working method. I have no papers to remove, I just used the pattern, and carry on.

I'm looking forward to see this quilt really start taking shape. I'm working out of turn so I'm not as far along as most of you who have been creating Oma step by step each month. Today I have some extra prepping to do (if I get some spare time later on in the evening).

You've seen how I've opted to create BB2 this month. Of course, you could opt for a different colourway, depending on what effect you want this block to create in your border.This is the image from the pattern. Make 30x and set aside.


Oma's Blues is my current FREE BOM. 
You can still join this free BOM right now - all parts are available over in my Group.

Wednesday, 12 August 2015

WOW: More Oma Prepping

WOW = WIPs On Wednesdays
It looks like August is going to be Oma's month! I'm working non stop to get this quilt top done. I love making progress as fast as this because I have quilts waiting in the wings. My family keep asking me why I'm complaining about being 'hard at work' when 'all I'm really doing is hobbying' - but they don't understand. Quilting at this pace IS a job, and a full time one at that!

Here's my Oma's Blues Prep Box. I have an individual prep box for every quilt I'm working on. It means I always have something to be getting on with, especially when I get tired of seeing the same quilt over and over.
What's Your WOW?

Tuesday, 11 August 2015

Oma's Blues: Making the BB1 Blocks

This is how I'm making the BB1 block. I've opted to piece, however you could also applique this block if you wanted to. For myself, I think piecing is faster and I did get through my 30x blocks in a day, which worked for me.

First up, is the always difficult choice of selecting fabrics. It should be easier when you have a two colour quilt like Oma, but believe me - I still ummmed and ahhhed for many hours before deciding on my final choice. These blocks make up a border which, in my mind, looks like an abstract vision of Delft stacked plates and dishware.
After fabric selection comes organised, scheduled preparation. I cannot stress enough how important it is to break up your task into segments of work. If I had attempted to make 30x blocks from scratch all in one day, it would have been too much to get through. I find it much easier to constantly 'prep' work and tuck it into envelopes to return to later. This is a great activity to do when I only have an hour or so free and it means that at some later time my work will come together 'quickly'. Well, it will look quick, but really there will be many little hours of preparation that have all come together.
pay careful attention to the curve as you stitch, it needs to be accurately and evenly stitched
 
I'm using Polyfuse which is a wash away fusible because it makes my work process faster and this means I don't have to remove the paper. Another advantage is that the fusible adds some stability to the fabric and this actually makes neat stitching easier than sewing without it.
Before sewing the second half, I'm pressing the seams away from any white area of fabric (because it will show through the white!). I do this throughout my work, if I left it all until the end I would probably never get around to doing it. When the blocks are completed, I will iron these folds into position, however this step now makes that process much faster when I am at the ironing board. Spotting seams of fabric show through which or light patches is a real annoyance of mine. As this quilt contains a light white background and many dark blues, I'm especially wary of keeping my blocks 'neat'. 
Before moving on, check seam lines. They must be neat and accurate. When they're not, I unpick and then re-sew them. Yes, this even happens to me. Don't hesitate to correct your work at the block stage, there's nothing worse that spotting these careless mistakes when the whole quilt top is completed.
Only when I am completely satisfied and my seams are flattened correctly, do I start with finishing the block
When the block is complete, I stack it to maintain the turned seams ready for ironing and final trimming later. I will trim my blocks down to size altogether at the end before sewing the border together.

Oma's Blues is my current FREE BOM. 
You can still join this free BOM right now - all parts are available over in my Group.


Related Posts Plugin for WordPress, Blogger...